MAKEUP FOR DEEP SET EYES
Being an aviator by profession, I was all about Wings... be it on my uniform, my sanitary pad or even my eyeliner! I loved the winged eyeliner look, but somehow it was a huge challenge to do that on my eyes. I followed the winged liner tutorials, by professional Makeup Artists, to the T... but somehow those steps just did not work out when it came to my eyes. After some head banging and research I realised that it was because I had deep set eyes and the traditional classic winged look did no good except making my eyes look all the more sunken and small! Thats when I started experimenting with something that would suit my eyes and came up with this self confessed brilliant hack! The winged look for Deep set eyes!
- IDENTIFICATION OF DEEP SET EYES
Deep-set eyes have nothing to do with the shape of your eye, instead, it’s all about the position. Lemme explain... usually by looking at the distance between your brow arch and the lashes and how and where your lid folds over, you can determine the shape of your eyes which can be Hooded, round, upturned or almond-shaped. With deep-set eyes, however, the case is different...
- The best way to find out if you have deep-set eyes is to examine your face from the side. Deep-set eyes are set further into the skull. This means that the brow bone is more prominent and sometimes overshadows the eyes, which can make them look small.
 |
| Look side ways and examine your face |
- Remember that it’s not only the position of the eye which determines what the best way to do your make-up is, that also depends on the shape. Once you know your eye shape and position, make-up becomes much easier to do.
2. BASIC RULES TO FOLLOW FOR DEEP SET EYES
Always start with a dab of eye primer on your lids and the area underneath your eyes to ensure that your efforts don’t go to waste. This step also extends the staying power of your makeup.
Concealer is important for anyone, but especially if you have deep set eyes, this is going to be your best friend! The eye shape already creates shadows on the eyes and emphasizes the dark circles.
- Crease colour | Contouring the eye
Contour your eyes right above the actual crease – almost right under the brows (unlike the more contemporary, into the crease), but do leave a small gap there. I used a slightly warm peachy colour. A warm colour works well, when you want to soften the area and not draw too much attention to it. Always use a matte shade while contouring this area...
- Use matte shades to sculpt the eye
In the outer corner of your eyelids and above the crease, you need to contour with matte shades. You don’t want to bring shimmer to those areas, you’re trying to give an illusion of being 'pushed in'.
In this particular makeup tutorial shown below, I applied a mix of shimmer and matte colors. matte on the outer corner and shimmer on inner corner and centre of the lid. You can play with colours here as much as you like! Even though it’s not that visible when the eye is open, there is room to surprise your audience every time you blink. Do not forget to bring the eye shadow high enough to the brow bone area, so that some of it shows, when the eye is open. Make sure to blend the lid colour to your crease colour with a transition color, so it looks nice and blended.
- Merging the lower lash-line with upper lid colors
If you use a dark shade on your lower lash-line, the eye kinda sinks a bit deeper. So concentrate the darker shade on only the outer corner of lower lash line and blend with lighter colors as you go inner to the teardrop region. Don’t leave it completely bare. A good idea is to apply the same colour on your lower lash-line, that you used on your lid and crease, will make the makeup look more put together..
Although I haven't used Falsies in this particular tutorial, a good pair of false lashes, really, really make a huge difference in popping out the eye and making it look more awake!
And now for the most important part of the tutorial... the perfect wing for Deep Set Eyes...
Lets begin...
3. PERFECTING THE WINGED EYELINER FOR DEEP SET EYES.
 |
- Prime your eyes with a primer and apply a light matte shade all over your lid including the brow bone.
- A deep set eye has a prominent crease which goes all the way to the outer corner of the eye.
|
 |
- Apply a darker matte transition color into the crease and extend it onto your brow bone, leaving very little space below your eyebrows.
- Blend well till no harsh lines are visible.
|
 |
- Slightly open your eyes looking down to spot the most prominent crease.
- Taking concealer onto a flat eyeshadow brush, outline the crease and bring it all the way down to the lash line.
- Apply loose translucent powder over the concealer to set the concealer and prevent any visible lines.
|
 |
- Apply shimmery eyeshadow using your fingertips from the inner corner to the outer corner of the lid onto the cut crease concealed area.This will help 'pop out' the eyes.
- Dab a darker pigmented matte color onto the outer corner of the lid only and Blend well with the shimmery shadow.
- Mark the point where your most prominent crease ends with a dot. (dot 1)
- Now mark the end of your outer lash line with another dot. (dot 2)
- Mark a third dot in between the former two dots such that it points towards the end of your eyebrows. (dot 3)
- Now join dot number 1 and 3.
- Join dot number 2 and 3 as shown in the picture above.
|
|
 |
- Extend the upper 'V' towards the lash line.
- Draw a thing line with an Eyeliner onto the upper lash line, till it meets the extended 'V'.
- Also, extend the lower end of the'V' to meet the lower lash line.
|
 |
- Apply concealer under your eyes to hide the dark circles and bake it with a loose setting powder.
- Brush off the excess powder.
- Now using a pencil brush, apply the dark matte color used on the outer corner of your upper lid, onto the outer corner of lower lash line.
- Apply the transition matte shade onto the inner corner of lower lash line and blend seamlessly with the darker color.
- Add a hint of shimmer onto the tear drop and highlight the area under the eyebrow to give depth and definition.
|
 |
- Outline the inner waterline with a nude eye-pencil.
- Fill in your Brows for more definition
- Finish off with a thick coat of Mascara on the upper and lower lashes
- Add on a pair of False Eyelashes to elevate the look to the next level(Not applied here)
|
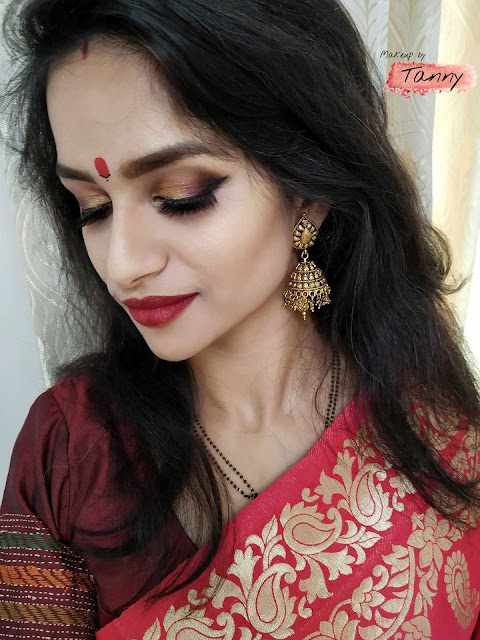
Here is the final look... See for yourself!
 |
| The final look! |
I think the picture speaks for itself, but basically I followed my own rules and first contoured the eye above the crease and slightly under the brow with a peach colour. Then I used purple shade all over the lid and blended that high enough, so that some of it shows when the eye is open. The purple shade is matte. I added a pop of shimmer pink colour in the inner part of the eye and blended that with the purple colour, so that the transition is subtle. Same goes to the lower lash line. I added a highlight to the inner corner and under the brow, winged the eyes, applied mascara and finally blended it all together for a put together popped out look!
4. PRODUCTS USED
Eyes
- Makeup Revolution Focus and Fix Eye Primer
- Huda Beauty Rose Gold Remastered Eyeshadow Palette
- Sephora Brow Kit
- Lakme Eyeconic liner pen Fine tip- Black
- Kiko Milano perfect eyes Duo Highlighter Pencil
Face
- Lagirl Pro conceal Concealer
- Maybelline Fitme setting powder in 220
- Huda Beauty 3D highlighter Pallete and Blush
- Huda Beauty Foundation in Latte
Lips
- Huda Beauty Matte Lipstick in Spice Girl
- Biotique Lip Plumper Lip Balm
When you apply your makeup using the right techniques and a bit of skill, deep-set eyes can look extremely bright and oh-so-intense! It does take some practice to master the techniques, so keep at it.
Make those gorgeous eyes stand out. Are you excited to try out this tutorial? Let me know in the comments section below....


Comments
Post a Comment